From Zero to Dino-Roar: Teaching a T-Rex to Walk with MuJoCo and Reinforcement Learning
A deep technical walkthrough of building a biomechanically faithful T-Rex in MuJoCo and training it to balance, walk, and hunt through three-stage curriculum learning with PPO — achieving a 96.7% bite success rate on commodity GPU hardware. Covers MJCF model design, Gymnasium environment architecture, reward engineering with mathematical formulations, and real training results from the Mesozoic Labs open-source project.
Introduction: Where Paleontology Meets Reinforcement Learning
What if you could bring a Tyrannosaurus Rex back to life — digitally — and teach it to walk, run, and hunt? That is exactly the premise behind Mesozoic Labs, an open-source research project that uses MuJoCo physics simulation and reinforcement learning to develop realistic locomotion controllers for robotic dinosaurs.
This post is a deep technical walkthrough of how we built a biomechanically faithful T-Rex model, wrapped it in a Gymnasium environment, and trained it through a three-stage curriculum — from standing still, to walking, to sprinting at prey and delivering a bite. Along the way, we will unpack the mathematics of reward shaping, the architecture of our policy networks, and the real training results achieved on commodity GPU hardware.
Part 1: Building the Digital Predator — The MuJoCo MJCF Model
MuJoCo (Multi-Joint dynamics with Contact) is a research-grade physics engine built for robotics and biomechanics. Models are defined in an XML dialect called MJCF, where you specify rigid bodies, joints, actuators, and contact geometry in a hierarchical tree.
Anatomical Structure
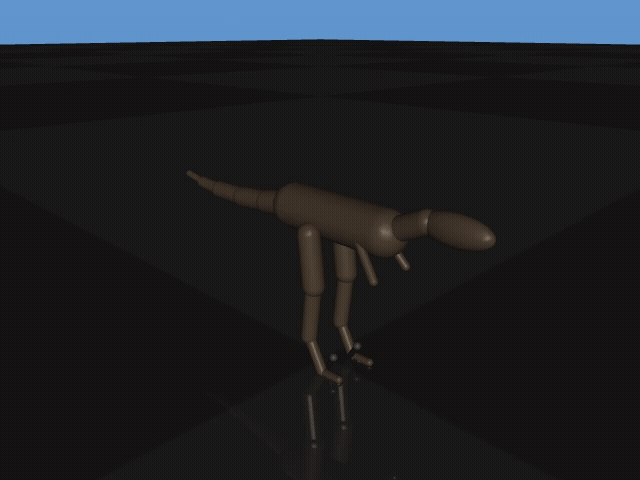
Our T-Rex model is organized as a kinematic tree rooted at the pelvis, the heaviest body in the model and the center of mass. From there, the skeleton branches into:
- Torso chain — pelvis → torso → ribcage → belly, forming the trunk and providing mass distribution for balance.
- Head and neck — Two neck segments with pitch and yaw control, plus a massive skull (sized to represent roughly 60% of the forward force). Three actuators control neck pitch, neck yaw, and head pitch — critical for the bite-attack stage.
- Hind legs (×2) — Digitigrade limbs with hip (ball joint), knee (hinge), ankle (hinge), and three forward-facing toes. Each leg contributes 7 actuated degrees of freedom.
- Tail — Five articulated segments providing a dynamic counterbalance to the skull. Four actuators control the tail, which is essential for maintaining postural stability during locomotion.
- Vestigial forelimbs — Present in the model for visual fidelity but deliberately non-actuated, reflecting the T-Rex's evolutionary anatomy.
In total, the model comprises 28 joints (1 free root joint, 25 hinge joints, and 2 ball joints) driven by 21 position-controlled actuators. Key simulation parameters include a 0.002-second timestep and carefully tuned stiffness/damping values — leg joints use a stiffness of 40.0 while tail joints use 80.0 to maintain structural rigidity.
The MJCF XML
Here is a simplified excerpt of the model definition (the full model lives at environments/trex/assets/trex.xml):
<mujoco model="trex">
  <option timestep="0.002" integrator="implicitfast">
    <flag warmstart="enable"/>
  </option>

  <worldbody>
    <!-- Ground plane -->
    <geom type="plane" size="50 50 0.1" />

    <!-- Prey target (mocap body) -->
    <body name="prey" mocap="true" pos="6 0 0.5">
      <geom type="sphere" size="0.3" rgba="1 0 0 0.7"/>
    </body>

    <!-- T-Rex root -->
    <body name="pelvis" pos="0 0 1.1">
      <freejoint name="root"/>
      <!-- Torso, limbs, tail, head... -->
    </body>
  </worldbody>

  <actuator>
    <!-- 3 neck/head + 14 leg + 4 tail = 21 actuators -->
    <position name="neck_pitch" joint="neck_pitch" kp="60"
             ctrlrange="-45 45" />
    <position name="right_hip_pitch" joint="right_hip_pitch" kp="120"
             ctrlrange="-60 80" />
    <!-- ... -->
  </actuator>
</mujoco>
The model also includes sensors for the pelvis gyroscope, accelerometer, orientation quaternion, and foot contact forces — all of which feed directly into the observation vector.
Part 2: The Gymnasium Environment
Raw physics simulation is not enough. To train with reinforcement learning, we need a proper Gymnasium environment — a standardized interface that defines observation spaces, action spaces, reward signals, and termination conditions. Our TRexEnv class extends a shared BaseDinoEnv base class.
Observation Space (83 Dimensions)
At every timestep, the agent observes an 83-dimensional vector composed of:
- Joint positions and velocities — 64 dimensions capturing the full articulated state of every joint in the kinematic tree.
- Pelvis orientation and dynamics — 10 dimensions including the orientation quaternion, angular velocity, linear velocity, and linear acceleration from the accelerometer.
- Foot contact states — 2 binary signals indicating whether each foot is on the ground.
- Prey tracking — 4 dimensions encoding the direction vector to the prey and the Euclidean distance.
Formally, the observation at time t is:
$$o_t = [q, \dot{q}, R_{\text{pelvis}}, \omega, v, a, c_L, c_R, \hat{d}_{\text{prey}}, \|d_{\text{prey}}\|] \in \mathbb{R}^{83}$$
where q and q̇ are generalized joint positions and velocities, R is the pelvis orientation quaternion, ω is angular velocity, v is linear velocity, a is accelerometer output, cL and cR are left/right foot contacts, and d̂prey is the unit direction vector toward the prey target.
Action Space (21 Dimensions)
The agent outputs a 21-dimensional continuous action vector mapped to position targets for each actuator:
- Neck/head control — 3 actuators (neck pitch, neck yaw, head pitch)
- Right leg — 7 actuators (hip pitch, hip yaw, knee, ankle, 3 toes)
- Left leg — 7 actuators (mirror of right leg)
- Tail — 4 actuators controlling the proximal-to-distal tail segments
$$a_t \in \mathbb{R}^{21}, \quad a_i \in [a_i^{\min},\, a_i^{\max}]$$
Part 3: Reward Engineering — The Heart of the System
Designing the reward function is arguably the most critical — and most nuanced — part of training a locomotion agent. A poorly shaped reward leads to degenerate behaviors: hopping in place, spinning in circles, or exploiting physics glitches. Our reward function is a weighted sum of over a dozen components, and the weights change across curriculum stages.
Termination Conditions
An episode terminates when any of these occur:
- The pelvis height falls below a minimum threshold (the T-Rex has fallen).
- The pelvis tilt exceeds the maximum allowed angle.
- The forward pitch triggers the nosedive termination check.
- The agent successfully bites the prey (Stage 3 — a "success termination").
- The maximum episode length is reached (500–1000 steps depending on stage).
Part 4: Three-Stage Curriculum Learning
Teaching a 21-actuator bipedal predator to hunt from scratch is too hard. The reward landscape is simply too sparse — the agent would never stumble into a successful bite by random exploration. Instead, we use curriculum learning, breaking the task into three progressive stages where each stage builds on skills learned in the previous one.
Stage 1: Balance (500K steps)
The goal is simple: stand up without falling. The reward heavily emphasizes the alive bonus (1.75), posture (1.5), nosedive avoidance (1.5), and height maintenance (1.0). A drift penalty (0.3) and speed penalty (0.3) actively discourage movement — we want the agent to learn stability first. A fall penalty of −100.0 provides strong negative signal.
PPO hyperparameters are conservative: learning rate 3×10⁻⁵, γ = 0.98 (shorter horizon since balance is immediate), rollout buffer of 2048 steps, and a [512, 256] network.
Promotion criterion: average episode length ≥ 750 steps for 3 consecutive evaluations.
Stage 2: Locomotion (1M steps)
Now the agent must walk forward. The forward velocity reward activates, the alive bonus persists, and the drift/speed penalties relax to allow movement. The agent loads the trained policy from Stage 1 and fine-tunes, retaining its balance skills while learning to take steps.
Promotion criterion: minimum average reward threshold plus minimum forward velocity sustained over consecutive evaluations.
Stage 3: Hunting (2M+ steps)
The final and most challenging stage. A prey target (a red sphere) spawns at a random position 2–6 meters ahead with up to ±1.5m lateral offset. The agent must sprint toward the prey and deliver a bite — making head-to-prey contact. The alive bonus drops to 0.0, replaced by massive bite incentives: a 1000-point bite bonus, approach shaping (3.0 weight), and head proximity reward (1.0 weight). The heading alignment reward (0.5) helps the agent orient toward randomly-placed prey.
PPO hyperparameters shift for longer-horizon planning: γ = 0.995, larger rollout buffer of 4096, and a reduced clip range of 0.15 for stable fine-tuning.
Stage Transition Mechanics
The CurriculumManager orchestrates stage transitions. When an agent meets all promotion criteria for the required number of consecutive evaluations, the system:
- Saves the current policy and normalization statistics.
- Loads the next stage's TOML configuration (reward weights, hyperparameters, episode length).
- Applies a warmup phase — temporarily reducing the PPO clip range to 0.02 and increasing entropy to 0.02 — to prevent catastrophic forgetting during the reward distribution shift.
- Ramps new reward components (e.g., forward velocity weight) from 10% to full value over 500K steps, avoiding sudden gradient shocks.
- Carries forward observation normalization statistics but resets return statistics, since reward distributions change between stages.
Part 5: PPO — The Algorithm Behind the Locomotion
We primarily use Proximal Policy Optimization (PPO), a policy gradient algorithm well-suited to continuous control. The core idea is to update the policy to maximize expected return while constraining the size of each update to prevent catastrophic changes.
The PPO clipped surrogate objective is:
$$L^{\text{CLIP}}(\theta) = \mathbb{E}_t \left[ \min\!\Big( r_t(\theta)\,\hat{A}_t,\;\text{clip}\big(r_t(\theta),\,1-\varepsilon,\,1+\varepsilon\big)\,\hat{A}_t \Big) \right] \quad \text{where } r_t(\theta) = \frac{\pi_\theta(a_t \mid s_t)}{\pi_{\text{old}}(a_t \mid s_t)} $$
Here πθ is the policy, Ât is the Generalized Advantage Estimate (GAE), and ε is the clip range (0.2 in Stage 1, 0.15 in Stage 3). The advantage is computed as:
$$\hat{A}_t = \sum_{l=0}^{\infty} (\gamma \lambda)^l \, \delta_{t+l}, \quad \text{where } \delta_t = r_t + \gamma \, V(s_{t+1}) - V(s_t) $$
Our policy network is a two-layer MLP with architecture [512, 256] and separate value head. Both policy and value functions share no parameters, following Stable-Baselines3 convention.
Part 6: Training Results
All training was conducted on a Google Colab L4 GPU.
T-Rex (PPO) — All 3 Stages Passed | 22M Steps | 13:02:32 Total
Key observations from the training:
- Stage 1 converged to a near-perfect balance policy with a best reward of 3008.66 and negligible forward velocity (0.02 m/s), confirming the speed penalty successfully suppressed premature locomotion.
- Stage 2 achieved an impressive average forward velocity of 3.47 m/s — the agent learned an efficient bipedal gait with alternating leg swings and dynamic tail counterbalancing.
- Stage 3 reached a 96.7% bite success rate in 4 hours and 10 minutes. The approach shaping and head proximity rewards created a smooth gradient that guided the agent from sprinting toward the prey to precisely positioning its head for contact.
Comparison with Velociraptor
The T-Rex outperformed the Velociraptor in its predatory task (96.7% bite vs. 93.3% strike) while training faster (13:02:32 vs. 11:25:15 total). The T-Rex's simpler attack mechanism (head contact vs. sickle claw strikes requiring precise limb positioning) likely contributed to the higher success rate.
Part 7: JAX/MJX Acceleration
For faster iteration, Mesozoic Labs also supports a JAX-native training pipeline using MuJoCo's MJX backend. This enables running 2,048 parallel environments on a single GPU, dramatically accelerating data collection. The JAX PPO implementation mirrors the Stable-Baselines3 pipeline but operates entirely within JAX's JIT-compiled, vectorized framework.
The JAX configuration for Stage 3 uses 2048 parallel environments, 64-step rollouts, 800 total updates, and a minibatch size of 512 — producing roughly 105 million environment interactions per training run.
Part 8: What is Next
The Mesozoic Labs roadmap includes several exciting directions:
- Domain randomization — Varying friction, damping, gravity, actuator strength, and adding external perturbations and observation noise to produce robust policies.
- Terrain adaptation — Training on uneven ground and obstacle courses.
- Multi-agent pack hunting — Coordinated Velociraptor pack behaviors using multi-agent RL.
- Sim-to-real transfer — Deploying learned policies on physical robotic platforms.
- New species — Deinonychus (pack hunter), Compsognathus (small fast biped), and Stegosaurus (armored quadrupedal defender).